Example 1
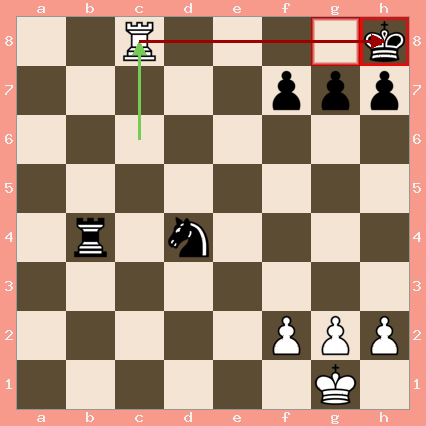
The white rook moves to the back rank and delivers checkmate to the black king.
White plays the move Rook to c8, where checkmate is delivered. You might notice that the king can't escape, because the pawns are in the way. Also, no other piece can block the rook's line of fire, so therefore this position is already a checkmate, and white wins.
This doesn't mean that castling is a bad move. Castling is actually good during the opening, because it gives your king some protection, but you must watch out for this kind of checkmate in one of your games. To prevent this from happening, you can give some "luft" to your king by moving one of the pawns in front of your castled wall, although it might weaken the pawns. You can also keep your back rank guarded by any of the lateral pieces.
Always watch out for this kind of checkmate, as it's very common to see in games.
Example 2
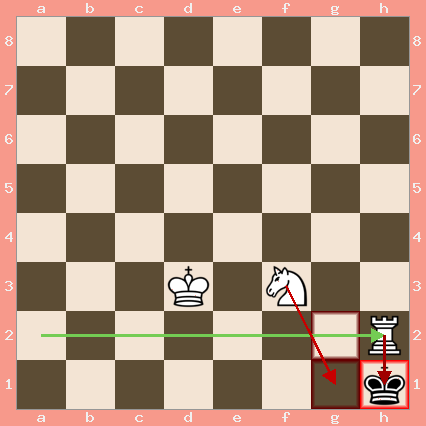
The rook and the knight work together to deliver checkmate with the king.
The last move played by white is moving the rook to h2, delivering checkmate to Black's king. The rook is backed up by the knight, so the king cannot take the knight. The g2 square is being protected by the rook, and the g1 square is being protected by the knight. Therefore, the position is checkmate, because all of the other squares the king can move to are being attacked.
This pattern does have significance when you don't really have a queen, and some minor pieces with a rook instead, but this pattern can be seen in the middlegame as well.
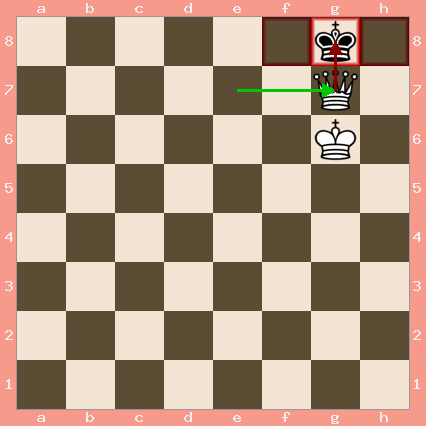
Example 3
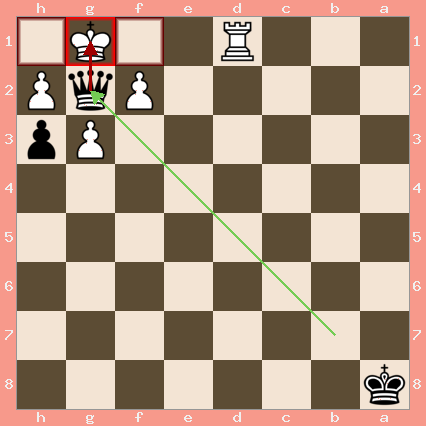
The queen and the pawn work together to deliver checkmate.
This checkmate does infiltrate the fianchetto one of the king-side bishops prepared by pushing the g-pawn forward one space. You can use one of those pawns to set up a checkmate net for your king. The h3 pawn controls the g2 square, making it available for the queen to move there to deliver a checkmate against the king. The squares the king can escape to are either blocked by his own pawns or controlled by the queen. Also, the king cannot capture the queen, because the queen is being protected by the pawn. Therefore, the position is a checkmate, and Black wins the game.
Take note that Lolli's checkmate is an example of a helper checkmate, where the queen is supported by another piece to deliver checkmate together! The helper piece can be any piece, even if it's the king or a pawn!
Example 4
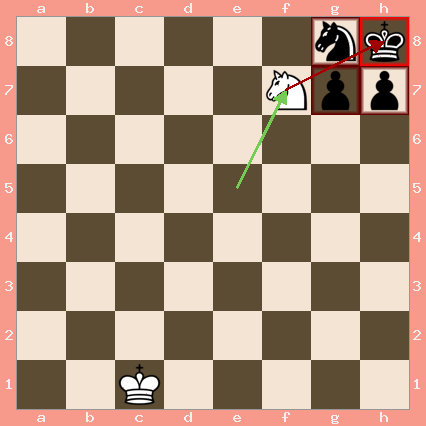
The knight alone checkmates Black's king with no squares to move to, delivering checkmate.
The last move played by white in this position was knight to f7, which puts the king in check. The king cannot move anywhere, because all of the squares are being occupied by the rest of Black's pieces. Also, the knight cannot be captured, so the position is such an astonishing checkmate.
The smothered mate is very satisfying, and getting it in a game will satisfy you a lot. It's also cool given that fact that only the knight, and no other piece can checkmate the king in a position like this.
In an endgame, you might be left with just four, three, or maybe two pieces when you're on the winning side. Given the limited pieces, you might be panicking and asking yourself how to checkmate with just a queen. You try, but you commonly end up with a stalemate. These checkmates are essential to win such endgames, even up to the grandmaster level where a lot of games are drawn.
Step 1 in Action
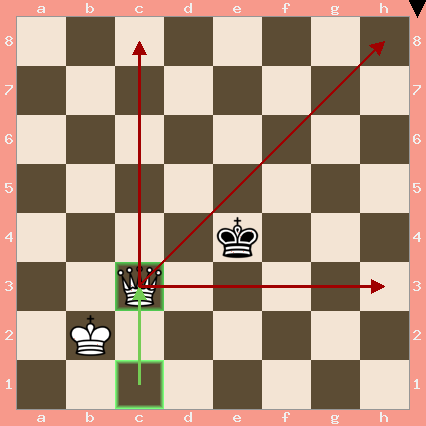
The queen makes a "fence" a knight's distance away from the king.
The last move played by White is moving the queen to c3, which makes a fence for the king. The king cannot step anywhere past the red lines created by the arrows because these squares are being controlled by the queen. In the following position, black only has three moves to make, whether to move the king to d5, f5, or f4.
From there, you want to follow every move the king makes, maintaining the knight's distance away from the king. There might be times where the queen would still be a knight's distance away, you still want to copy the king's move because the "fence" that is created will get smaller and smaller. Only use your queen at the moment, and prevent making any checks with the queen.
Step 2 in Action.
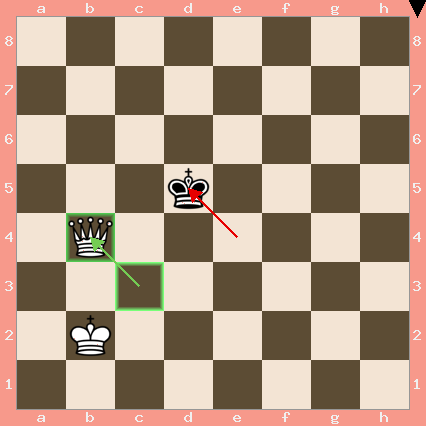
Black's king moves up and to the left one square, and White's queen does the same.
The following position shows Black's king making one move, and the queen replicating that move although she is a knight's distance away from Black's king. This move makes the fence smaller, and eventually Black will run out of squares to escape to when you continue following the king. However, you want to stop when this position is reached:
Stop at this position.
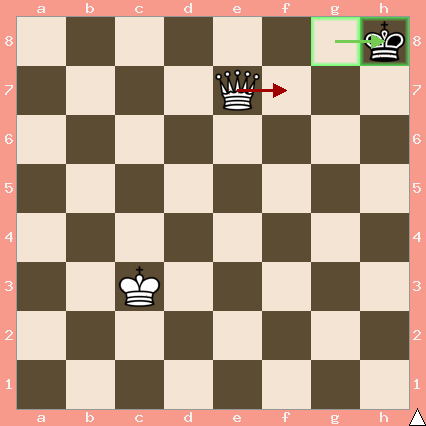
You must stop when the king touches the corner, because that's the end of the second step. If you do continue to follow the king one last time, the king has no more squares to move to not being in check. This means that the position is a stalemate, and the game is a draw. From there comes the third step of the process.
Do you mean like this?
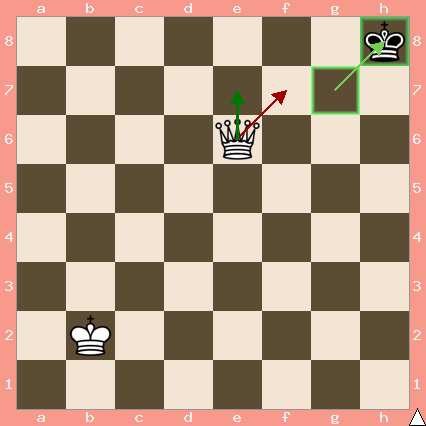
If so, then do not follow the king, because the king is already on the corner. If you do, you will create a stalemate. Instead, move the queen a step up, to cut the king to the edge of the board only. This means that White should move the queen to e7 instead of f7.
For the next step, that is when you start to use the king. You want to move the king towards the enemy's king, staying behind the queen's "cutoff wall"

The following arrows show the king's progress towards Black's king, moving to d3, to e4, to f5, and, finally, g6, while staying behind the queen's cutoff line that cuts the king off the 7th rank. From there, your king is in a position to help the queen out for the final step of the king and queen checkmate.
Time for the most fun part of the endgame... which is to deliver checkmate with your queen.
The king cannot capture the queen, because it's defended by the king, and kings can never be adjacent. All the other squares the king can move to are either controlled by either the king, the queen, or both, and the position is a checkmate, and White wins the game. I like to call this checkmate the "Queen Sandwich."
From there on out, it's all on practice. Continue to practice the checkmate pattern and you will be able to see it in your games in no time.
This checkmate pattern is much easier than the last one because it doesn't require too many steps unlike the king and queen checkmate. When you have two that are on oppsite files yet adjacent to one another, the checkmate is very easy. There are a few steps to this checkmate, and it's known as the "Ladder Checkmate."
Step 1 in Action
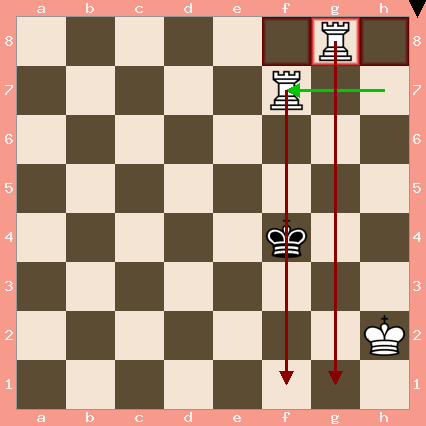
The rooks check the king and force the king to move a file backwards.
The rooks in this position work together to restrict the king's options, as well as restricting the king's movement options. One of the rooks delivers check to the king and controls one file, and the other rook controls the file before that. This does mean that the king must go towards the edge of the board while avoiding check, and that does mean you can continue to take those files away with your precious rooks. Even if the king is not on the file, you still want to move your rook to that file to control it, and to make your other rook control the next file. Think of it as climbing a ladder back in the playground, or as a part of your job. You're slowly using both hands to move up each of the rungs moving your hands to alternate rungs. From there, you are making the checkmate like that.
Your opponent's king would most likely try to attack your rooks while you're giving checks, because the rooks can be attacked by the king, unlike the queen. For example, you might reach this position, where your rooks are being attacked.
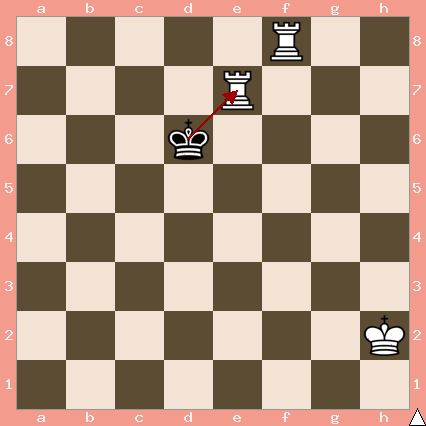
Black's king is attacking one of White's rooks, and that does mean that Black can capture the rook on e7 if White does not take any action. You can't make another check by moving your rook from f8 to d8, because the rook on e7 can be captured by Black's king. Fortunately enough, it is possible to deliver checkmate with just one rook, but the process is very hard.
Instead, you want to move the rooks to the other side of the board while controlling the files the king can't get past.
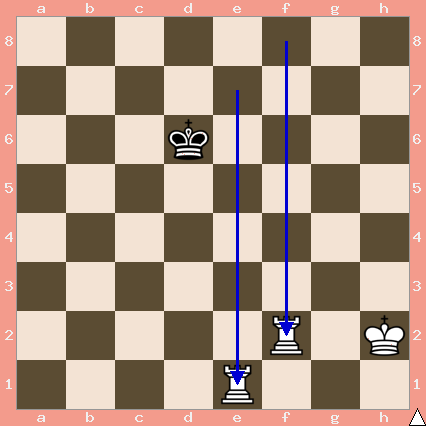
From there, Black's king is a long distance away from White's rooks, and it would take a lot more moves to attack them again.
If the enemy king does attack your rooks again, just repeat the step and move the rooks to the other side of the board maintaining control of the files.
Once you have continued to make checks and control the files by advancing your rooks, you will eventually get to the checkmate, which is always the fun part of every endgame.
The very last move White has played in this position is moving the rook to a1, which delivers check to the king. The king has absolutely nowhere to go, where all the squares on both the a- and b-files are being controlled by both of the rooks. The king also can't jump off the chessboard to escape the rooks, which is very silly. There is no such thing as a ninth rank or an I-file on the chessboard, unless you get a bigger one, in which the process would continue like normal, despite repeating step 2 multiple times. Also, there are no pieces that can take the rooks, or block the lines of fire, because Black only has a king left. So, this position is a checkmate, and White has won the game.
You can take note that this method would also work with two queens, or a queen and a rook. The main benefit of these are the fact that you don't have to worry about the king attacking your queens or the queen if the queen is in front of the rook, because the king can never directly attack the queen.