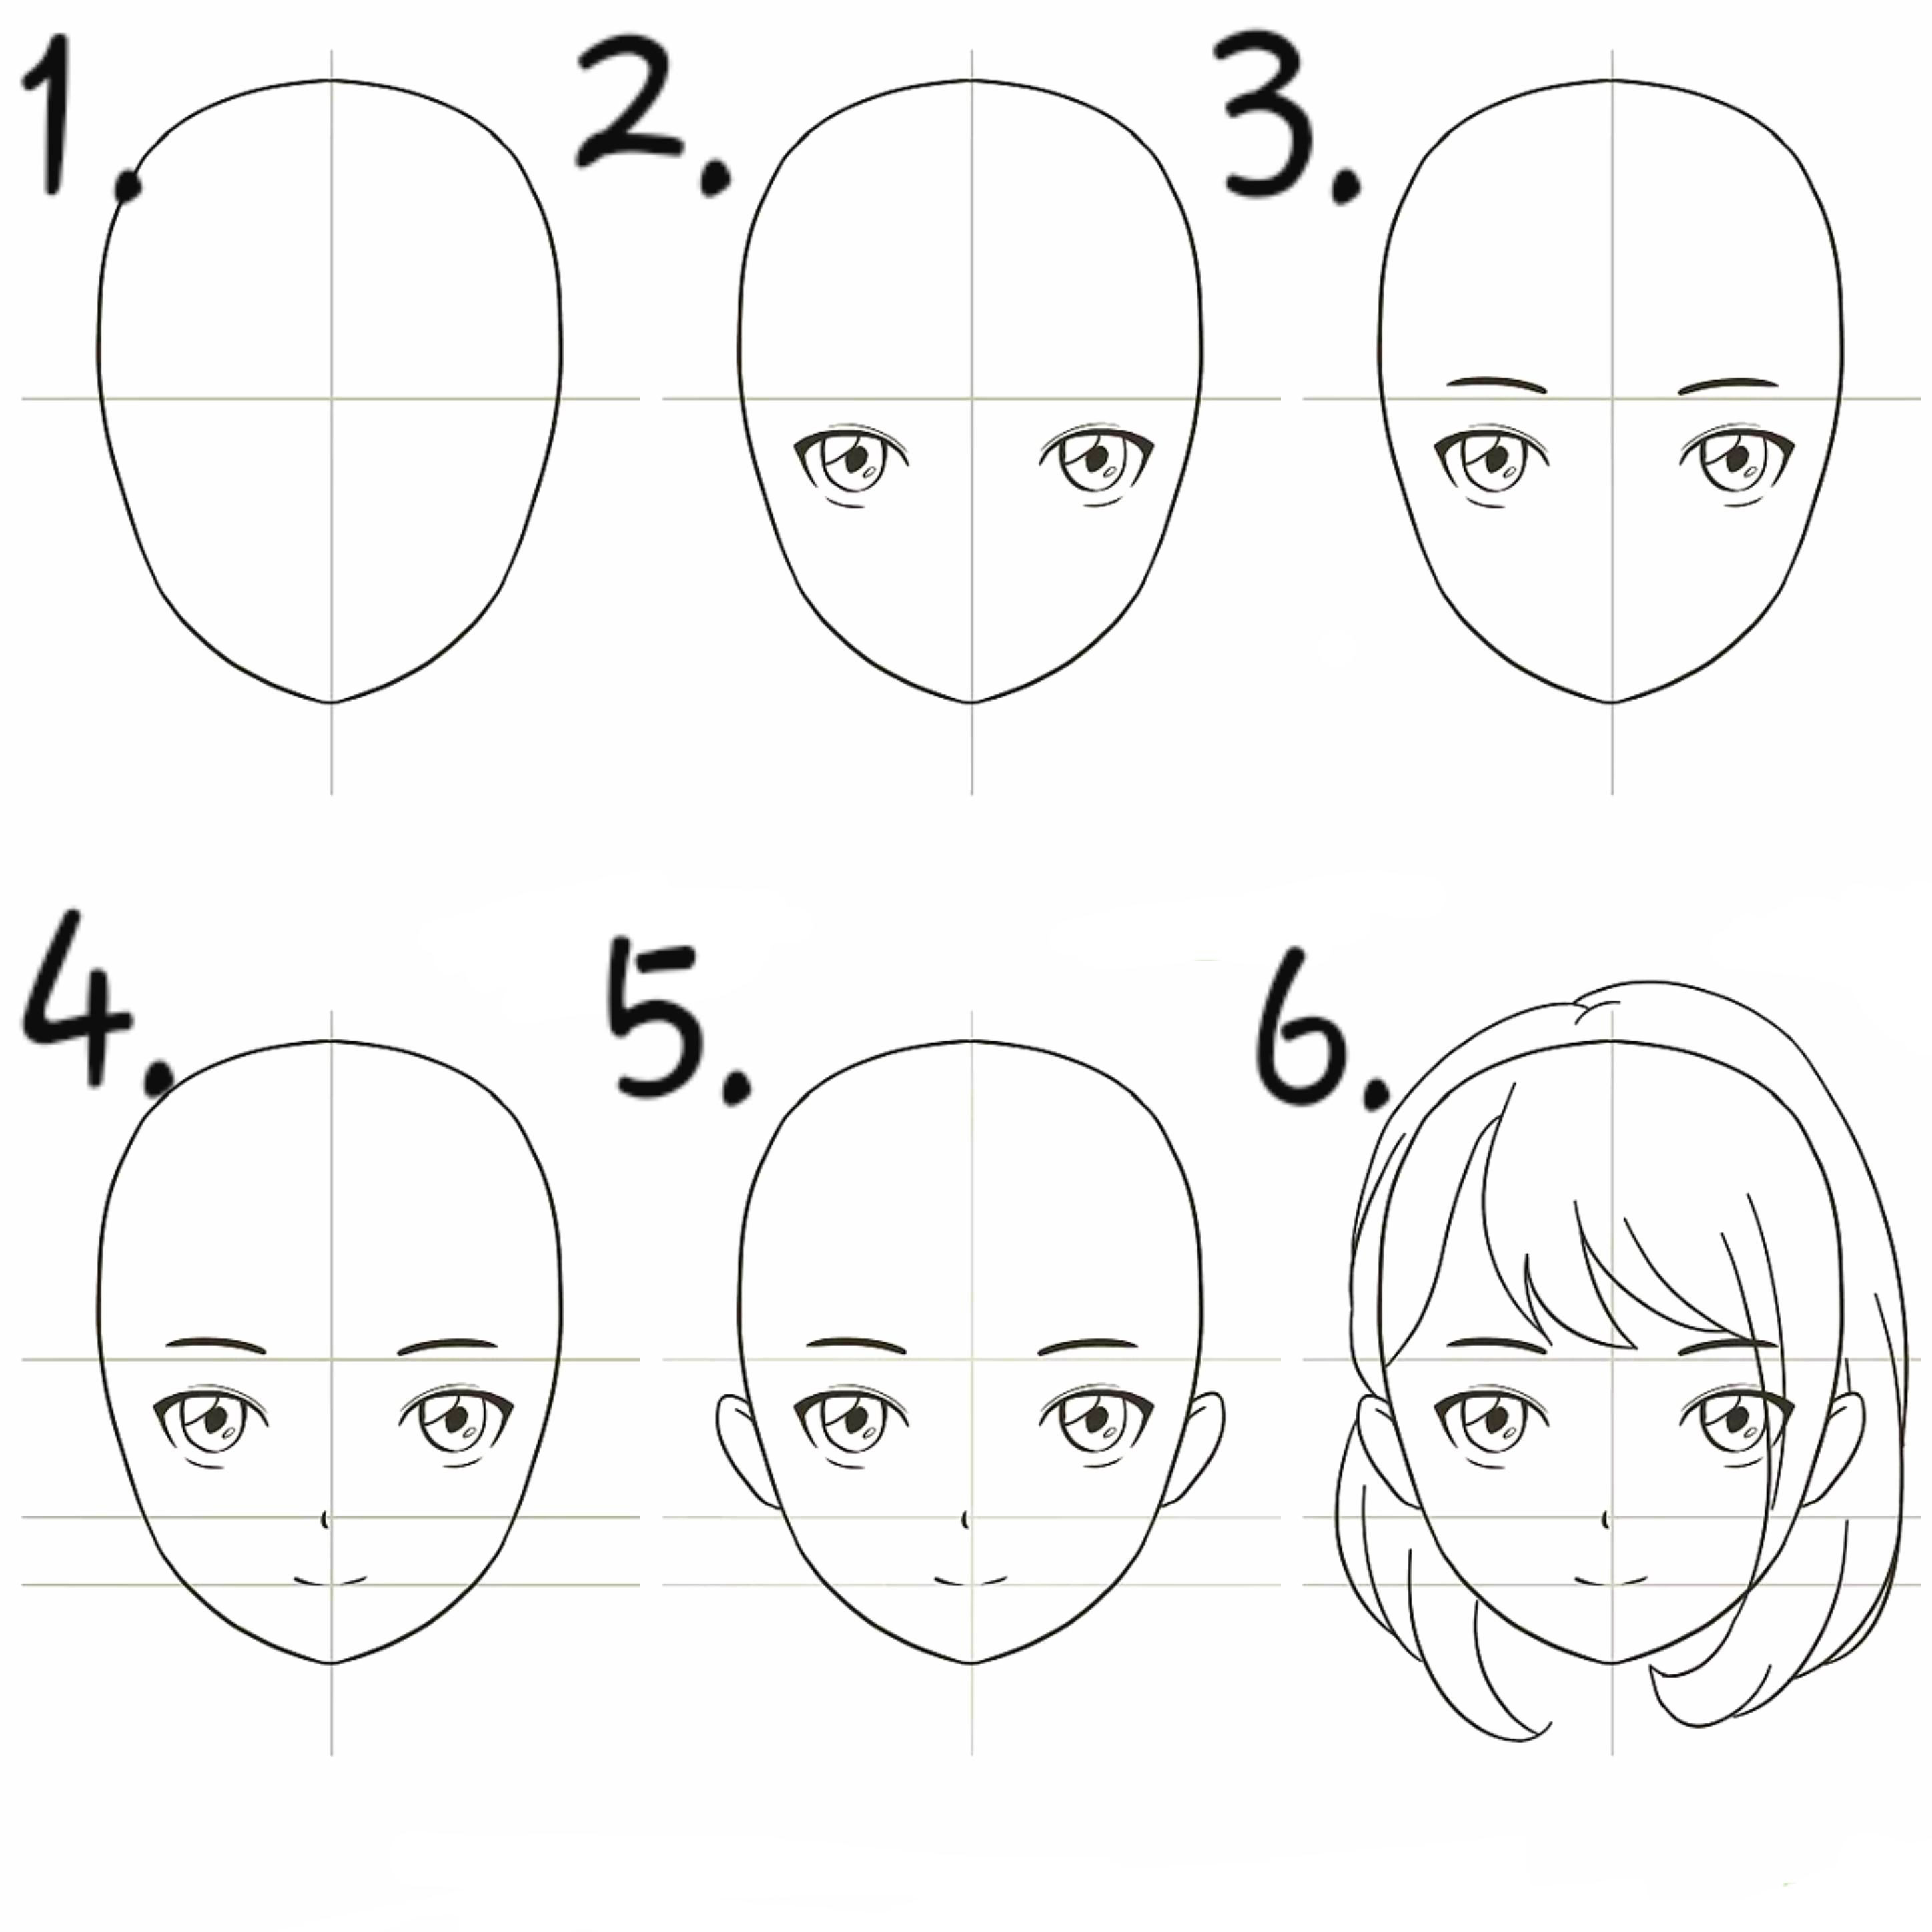
1. Draw an oval and divide it into 4 sections. This will be the basic outline of your anime character’s head. The proportions don’t have to be exact, but make the oval narrower at the bottom since that will be the chin. Once you’ve drawn the oval, draw a horizontal line through the center of it. Then, draw a vertical line through the center of it that intersects with the horizontal line. Later, you'll use these lines as guides to draw the facial features.
2. Draw the eyes underneath the horizontal line. Anime eyes are big and exaggerated, and they usually take up about 1/4 to 1/5 of the height of the face. To draw one, start by drawing a thick upper lash line just underneath the horizontal line you drew and on one side of the vertical line. Then, draw a semicircle coming down off the upper lash line, and draw a black pupil in the center of it. Next, draw a narrow, horizontal line underneath the circle for the lower lash line. Finally, shade in the circle around the pupil, leaving some white space so it looks like light is reflecting off of your character’s eyes.Do the same thing on the other side of the vertical line to make the other eye.
3.
Sketch the eyebrows above the horizontal line. Draw a long, downward curving line for each eyebrow. Make them slightly longer than the upper lash line you drew for the eyes. Then, thicken the ends of the brows that are at the center of the face.
(If you’re drawing a feminine anime character, make the eyebrows fairly thin. For a masculine character, thicken the eyebrows so they’re more prominent on the face.)
4. Add the nose halfway between the horizontal line and the chin. Anime noses are subtle, and they’re usually only defined when you’re looking at a character from the side. To draw your character’s nose, draw a short, simple vertical line along the center of the face at the halfway point between the horizontal line and the chin. Make the line longer if you want your character’s nose to be big.
Make the nose the smallest feature on your character’s face.
5. The nose will overlap with the vertical line you drew. To see it better, make it darker than the vertical line, or erase the vertical line around the nose. Masculine anime characters sometimes have noses that are more pronounced, but that’s not always the case. If you want your character’s nose to be more noticeable, draw a short horizontal line under the vertical line to represent the bottom of your character’s nose. Also, draw a triangle-shaped shadow on the side of the nose so it looks like the light is hitting your character from the side. For certain styles of anime, like chibi, you don’t even need to draw a nose at all!
6.
Put the mouth halfway between the nose and the chin. Find the halfway point between the character’s mouth and chin so you know where to place the mouth. If you want to make a simple mouth, draw a slightly curved horizontal line to make a smile or a frown. Put another slightly smaller line underneath the first to give the appearance of a bottom lip.
Look at different mouths and expressions for anime characters online to see how to make different expressions.
If you want to draw your character smiling with an open mouth, you do not need to draw every individual tooth. Only draw the line between the top and bottom teeth to separate them.
7. Add the ears to the side of the head. If you want your character to have long hair that’s covering their ears, skip drawing the ears. However, if your character’s hair is going to be short, draw a narrow oval on each side of the head. Have the top of the ears line up with the horizontal line running through the center of the face, and have the bottoms line up with the bottom of the nose. Then, draw the flaps of the ear inside each oval.
Experiment with the size of your character’s ears if you want them to be bigger or smaller.
Add the ears to the side of the head. If you want your character to have long hair that’s covering their ears, skip drawing the ears. However, if your character’s hair is going to be short, draw a narrow oval on each side of the head. Have the top of the ears line up with the horizontal line running through the center of the face, and have the bottoms line up with the bottom of the nose. Then, draw the flaps of the ear inside each oval.
Experiment with the size of your character’s ears if you want them to be bigger or smaller.
8.
Draw the hair on your character's head. The hairstyle you choose for your character is up to you, but generally, anime hair features pointed ends and distinct sections. You can draw a short, buzzed hairstyle, a medium-length style, or long, flowy hair. Whichever hairstyle you choose, avoid drawing individual strands of hair. Instead, draw big sections of hair, like 4 or 5 spikes at the ends.
If your character has long hair, you could draw 2 pigtails, one at each side of the head, with spiked ends. Or, you could draw their hair pulled up with a round bun at the top. Alternatively, you could give your character bangs by drawing 3 or 4 distinct sections of hair coming down over their forehead.
For a shorter hairstyle, you could draw 3 or 4 distinct sections of hair swooping to the side over your character’s forehead. Or, you could draw a hairstyle without any bangs and draw a few lines running from their hairline to the back of their head so it looks like their hair is combed back. Alternatively, you could draw a chin-length bob that’s divided into several thick sections.
 .
Erase the horizontal and vertical guidelines you drew. Erase them carefully so you don’t remove any of the facial features by mistake. Use a small eraser so you’re less likely to make mistakes.
Once you erase both lines, your character’s head and face are finished!
.
Erase the horizontal and vertical guidelines you drew. Erase them carefully so you don’t remove any of the facial features by mistake. Use a small eraser so you’re less likely to make mistakes.
Once you erase both lines, your character’s head and face are finished!